Why You’ll Love This Stuffed Cake Pops Recipe
If you’ve ever bitten into a cake pop and wished for a chocolatey surprise in the middle, these chocolate-filled stuffed cake pops will be your new go-to party dessert.
You’ll get tender cake on the outside, a soft truffle-like center, and a smooth, glossy chocolate shell that actually snaps. This guide covers everything:
the ideal cake-to-frosting ratio (so your pops aren’t mushy), how to make a spoonable ganache that stays plush, two coating paths (tempered chocolate or
candy melts), precise dipping temperatures, and smart workflow tips to keep your counters (and your sanity) clean.
Ingredients & Tools
For the Cake Pop Dough
- One 8–9 inch round cake, cooled (vanilla, chocolate, or red velvet).
- ⅓–½ cup frosting: vanilla buttercream, cream cheese frosting, or chocolate frosting.
For the Chocolate Filling (Ganache)
- ½ cup heavy cream
- 4 oz (113 g) finely chopped dark chocolate (55–64%)
- Pinch of fine sea salt + 1 tsp vanilla extract (optional)
For the Outer Shell
- Option A (Bakery finish): 16 oz couverture chocolate for tempering (dark or milk)
- Option B (Beginner-friendly): 16 oz chocolate candy melts/wafers + 1–2 tsp neutral oil as needed
- Sprinkles, crushed nuts, or cocoa nibs for decoration (optional)
Tools
- Digital scale (recommended), small cookie scoop, parchment, sheet pans
- Microwave-safe bowls and/or double boiler
- Instant-read thermometer (for tempering accuracy)
- Lollipop sticks and a cake pop stand or a block of styrofoam
Step-by-Step: How to Make Stuffed Cake Pops
1) Make the Cake Pop Dough
- Crumble the cake: Once completely cool, crumble the cake into fine crumbs. Trim any overly browned edges first for a tender texture.
- Add just enough frosting: Start with 2–3 tablespoons and knead. Add more a spoonful at a time until the mixture holds together when pressed. It should be pliable, not sticky or greasy. Overly soft dough = sagging pops.
2) Prepare the Chocolate Filling
- Heat the cream: Bring to a bare simmer (small bubbles at the edges).
- Combine with chocolate: Pour over the chopped chocolate. Let sit 2 minutes, then whisk from the center outward until glossy and smooth.
- Season (optional): Add a pinch of salt and vanilla for rounder flavor.
- Chill to the right consistency: Refrigerate 30–45 minutes until the ganache is scoopable—think soft truffle, not runny.
3) Portion, Fill, and Seal
- Portion the shells: Scoop cake mixture into 24 even portions (about 20–22 g each). Roll each into a ball, then flatten into a thick disc.
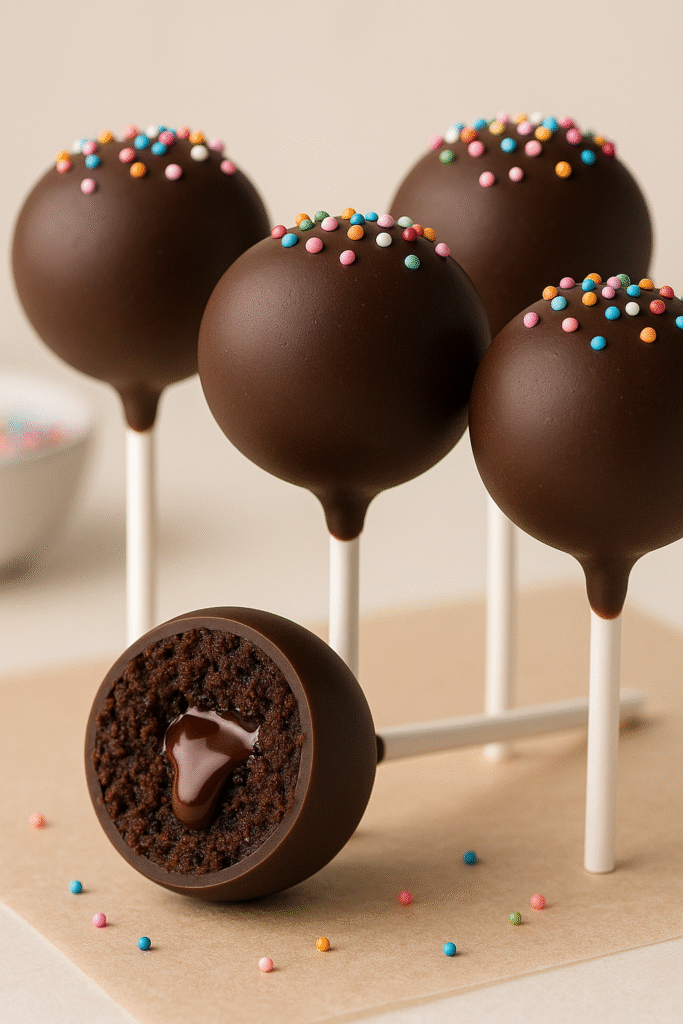
- Add filling: Place ~½ teaspoon of ganache in the center. Cup the disc around the filling and pinch to seal. Roll gently into a smooth ball with invisible seams.
- Chill briefly: Set the balls on parchment and chill 15–20 minutes. You want them cool and firm, not rock-hard (which can cause cracking later).
4) Attach the Sticks
- Glue step: Melt a tablespoon of your coating. Dip ~½ inch of a stick into the melted coating and insert halfway into a cake ball.
- Set: Repeat for all pops and chill 5–10 minutes. This “glue” step prevents pops from sliding off during dipping.
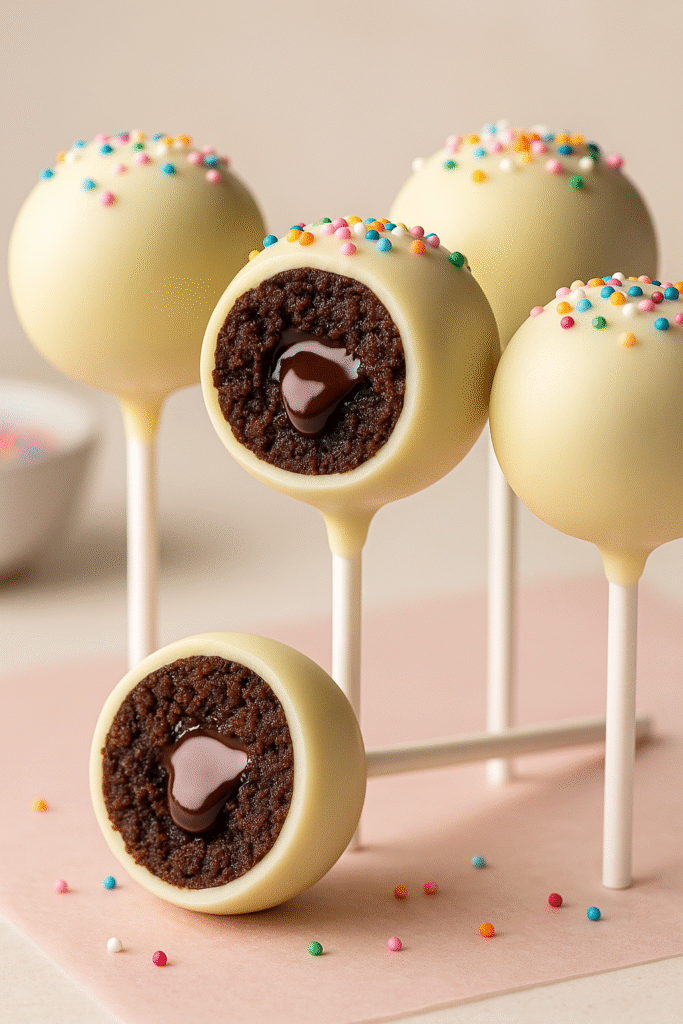
How to Create a Perfect, Hardening Chocolate Shell
A great shell should be thin, glossy, and crisp, with no streaks or dots. You have two reliable paths:
tempered real chocolate (best flavor and snap) or candy melts (easiest handling, consistent set).
Option A: Tempered Chocolate (Best Taste & Snap)
Tempering aligns cocoa butter crystals for shine and snap. The simplest home method is the seeding method.
- Chop & melt: Finely chop your chocolate. Melt about 75% of it gently to 113–118°F (45–48°C) for dark, or 104–113°F (40–45°C) for milk/white. Use a microwave in 15–20 second bursts or a double boiler (don’t exceed the upper limit).
- Seed: Off heat, add the remaining 25% finely chopped chocolate. Stir continuously to cool and bring the mass down to 88–90°F (31–32°C) for dark, or 84–86°F (29–30°C) for milk/white.
- Hold & test: Keep within that dipping range. Dab a little on parchment; it should set firm and shiny in 3–5 minutes at cool room temperature.
- Maintain temp: If it thickens, warm for just 2–3 seconds in the microwave and stir to stay in range. Never add oil to tempered chocolate; it can ruin the temper.
Option B: Candy Melts (Most Forgiving)
- Melt gently: Microwave in short bursts, stirring frequently. If too thick, add ½–1 teaspoon neutral oil at a time until it flows like warm honey.
- Target temp: Aim for ~85–90°F (29–32°C). Too hot will melt the cake layer and can cause leaks; too cool leads to thick, lumpy coverage.
Dipping, Tapping & Finishing
- Work in small batches: Keep half the pops chilling and half at room temp. Cold centers + hot coating = cracks, so aim for cool (not icy) pops and warm (not hot) coating.
- Dip straight down: Submerge to the stick base; do not swirl aggressively (air bubbles!). Lift and gently tap the wrist while rotating to shed excess for a thin shell.
- Decorate immediately: Add sprinkles or toppings before the shell sets.
- Set upright: Place in a pop stand or styrofoam. Let set fully at room temp for best shine. If your room is very warm, chill 3–5 minutes after a brief set at room temp.
Troubleshooting & Pro Tips
Prevent Cracks
Keep temperature contrast minimal. Don’t freeze the balls before dipping. If you see hairline cracks, your centers were too cold or coating too hot.
Stop Leaks
Seal the seam carefully and avoid overfilling. If a leak starts, let the pop set, scrape the excess, and patch with a thin second dip.
Avoid Mushy Texture
Measure frosting sparingly. The dough should shape cleanly without leaving residue on your hands.
Ultra-Smooth Finish
Roll balls between slightly damp palms for a sleek surface. Any bumps will show through a thin shell.
Flavor Tweaks
Add espresso powder to ganache, or infuse cream with orange peel, mint, or chai spices before pouring it over chocolate.
Color & Drizzle
For color, use colored candy melts or add oil-based candy colors to white chocolate (never water-based). Drizzle a contrasting tempered chocolate or melt for bakery stripes.
Storage & Make-Ahead
Uncoated balls: up to 2–3 days refrigerated. Finished pops: 3–4 days at cool room temp or 1 week in the fridge (box loosely to avoid condensation).
Clean Dips
Transfer your coating to a narrow, deep cup for effortless submersion and fewer air bubbles versus a wide bowl.
Serving for events? Batch and label flavors by sprinkle color. For transport, cushion the stand with tissue and keep away from heat and direct sunlight.
Complete Recipe: Chocolate-Filled Stuffed Cake Pops
Yield
About 24 cake pops (1½–2 bites each)
Timing
- Active time: ~60–75 minutes
- Cooling & chilling: ~45–60 minutes
- Total: ~2–2½ hours
Instructions (Concise Card)
- Make dough: Crumble cooled cake, add frosting gradually until it holds together.
- Make ganache: Cream + chocolate, rest, whisk, chill until scoopable.
- Fill: Portion dough; flatten, add ½ tsp ganache, seal, roll smooth; chill 15–20 min.
- Stick: Dip stick tip in melted coating, insert halfway; chill 5–10 min.
- Coat: Temper chocolate (or melt wafers). Dip, tap-rotate, decorate. Set upright to harden.
FAQs: Stuffed (Chocolate-Filled) Cake Pops
- 1) Why are my cake pops cracking after dipping?
- Usually temperature shock. Keep centers cool—not icy—and coating around 85–90°F (29–32°C). Let dipped pops set at room temp for a few minutes before brief chilling if needed.
- 2) Can I skip tempering and still get a nice shell?
- Yes—use candy melts. They’re designed to set without tempering. Thin with 1–2 tsp neutral oil if needed. Flavor is simpler than real chocolate but the finish is reliable.
- 3) My sticks wiggle or pop out. What gives?
- You probably skipped the “glue” step or your dough is too soft. Dip the stick in coating first, insert, and chill. Add less frosting to your dough next time.
- 4) What other fillings are safe?
- Nutella, thick peanut butter, cookie butter, thick caramel (dulce de leche), or a firm fruit gel. Avoid runny jams or thin sauces—they’ll leak or soften the dough.
- 5) How should I store and transport?
- Keep finished pops in a cool, dry place. For humid or hot weather, refrigerate in a box with airflow, then bring to room temp 15–20 minutes before serving to reduce condensation.
Expert Variations & Serving Ideas
- Triple Chocolate: Chocolate cake + chocolate frosting + dark ganache + milk chocolate shell.
- Cookies & Cream: Vanilla cake, cream cheese frosting with crushed chocolate sandwich cookies, white coating, cookie crumb dusting.
- Mocha Truffle: Add 1 tsp instant espresso to ganache; finish with dark chocolate shell and cocoa nibs.
- Salted Caramel Core: Swap ganache for thick caramel; sprinkle flaky sea salt onto the shell just before it sets.
For a lighter option, use a modest filling and a thin shell. You can also make mini pops for portion control at large events.
Success Checklist (Print-Friendly)
- Frosting added sparingly—dough is pliable, not sticky.
- Ganache chilled until scoopable, not runny.
- Seams sealed; balls rolled smooth.
- Stick “glued” with melted coating and set in the fridge.
- Coating at correct dipping temp; pops cool, not icy.
- Dip straight down; tap-rotate for a thin, even shell.
- Decorate immediately; let set upright to harden fully.